Painting a 54mm figure - El Viejo's Wounded Macedonian, CG117
by Stephen Mallia
After the first tutorial, in which I tackled the painting of the horse, it’s time to move on with the second part. In this part, and all the following parts, I will skip the preparation process. This for two reasons. Firstly, I will not make this repetitive and secondly, the procedure used in the first part applies throughout. In this second part, I will show my methods of painting a face. Please note that since the photos are enlarged some brush strokes etc may be highly visible but in reality these do not show in real life 54mm.
I always start with the face in a very high percentage of the figures I paint. If I’m successful, I find it a great moral boost for the painting of the rest of the figure. In my opinion, a figure is not complete if it has a badly painted face. It’s the first thing the viewer looks at. I will go along and add the text with each photo for ease of reference. In this way one can better follow the procedure.
Photo 1: In this photo the figure has been primed and left to dry. I do this with Citadel's Skull white primer spray can. Apply this from distance. In this manner you make sure you do not fill up any detail.
Photo 2: The whites of the eyes were painted in. For this step I never use pure white. It will make the eyes look stark. I like to use AC 60 grey for this. You can notice the difference between the colour of the eyes and the primer.
|
Photo 1 |
Photo 2 |
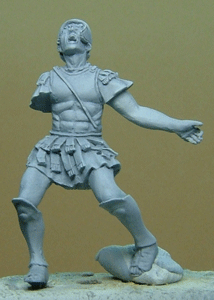

Photo 3: The pupils are painted with a light blue mix. For this particular subject I wanted an extreme look of pain so I left the whites of the eyes at the upper parts visible. The irises were painted with black and the small catch light with white added. No outlining has been done as yet.
Photo 4: The outlines for the upper and lower eyelids are painted at this stage. I use black for the upper eyelid and dark brown for the lower. At this stage these might look out of sorts but these will be further sharpened when the base colour is applied.
|
Photo 3 |
Photo 4 |


Photo 5: Base colour laid in with a ratio of 1 part paint to 2 parts water. Note that before I paint the base colour or any highlights/shadows I always undercoat the surrounding area. This will help me get a better balance between the colours.
|
Photo 5 |
Photo 6 |


Photo 7: Colours used to paint the face.
Photo 8: Now the real fun begins. The first highlight is laid in. This was a mix of the base colour with the addition of AV845. The ratio is approximately 1 part paint to 5 parts water. With this and all the following steps it's always advisable to soften the edges with washes of the previous colour. In this case it was the base. The second highlight is now applied. This is a mix of the first H/L plus some AV928 added with the same previous ratio. If you find the necessity to add some 'high spots' you may always do this with pure AV928 but be very careful. The areas concerned are minute.
Photo 9: The first Shadow is a mix of the base colour plus some AC14 and AV921. Contrary to the highlights, the shadows are laid in at a higher ratio of dilution. In fact it's not uncommon for me to have the paint thinned to 1 part paint and 8 (or even 9) parts water.
 |
|
| Photo 8 | Photo 9 |

Photo 10 (2nd shad 9/10): The mix for this step is black plus AV909. This is very dark but since the dilution rate is high you can control the intensity. This is because acrylics are translucent and need many layers to cover a particular area. Apply this colour only to areas that are in the deepest recesses where light does not reach. This colour is also used to outline some areas like face/helmet etc.

|
 |

|
 |
| Photo 11 | Photo 12 |
 |
 |
| Photo 13 | Photo 14 |
Photo 15: The so called 5 o'clock shadows are now applied. This is basically the beard area. Note that even these need to be highlighted since any H/L applied here will be partly covered when the washes are applied. This part was done with a mix of some grey, black and a little dark blue. Great care needs to be taken here. If not done correctly this step may ruin all the hard work you have done already. The ratio of dilution needs to be very high. In fact you will just have dirty water and it is to be applied in controlled layers.
 |
 |
| Photo 15 | Photo 15 |
Photos 16/17/18: The finished face with the mouth and lips painted in. The inside of the mouth was given a wash of gloss varnish.
 |
 |
|
Photo 16
|
Photo 17
|

Photo 18
Photos 19/20: The painting of the red tunic was practically done with the same techniques described. With red I always like to start with a rather dark colour and then work on the highlights. With this red I wanted a faded look so I added AV845 for the final highlights. The mixes for this and other colours will follow at the end of the tutorial.
 Photo 19
|
 Photo 20
|
Photos 21 - 26: The painting of the armour was rather lengthy since I proceeded in a different manner than usual. The undercoat here was a very dark brown (AV822). I firstly painted the armour in acrylics with all the highlights and shadows. At this stage the armour will not look right but no panic here. Just a few more steps and it will make all the difference. The next step was to take an enamel metallic colour by IDEA Metallici No.140 and thin it down with white spirit. The consistency is that of the shadows applied in acrylics, with only a hint of paint present. With this I applied a thin wash over all the metallic areas. With the mix being so thin all the shadows and highlights from the acrylics coat will show through. Leave this to dry thoroughly after which the deepest shadows are enforced in oils (burnt umber) and feathered with a dry brush.
|
Photo 21 |
Photo 22 |
|
Photo 23 |
Photo 24 |
|
Photo 25 |
Photo 26 |


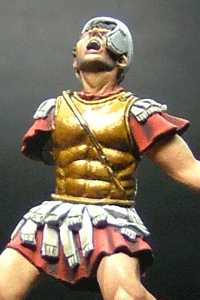

Photo 27: Colours used for the metallic parts.
Photos 29 – 33: The painting of the front side of the shield. The outer part was painted in the same manner as the other metallic parts. The inner circle was all painted freehand, including the blue design. These were shadowed in the usual manner. While the inner layer was left matt, the outer one was given a coat of gloss varnish.
|
Photo 29 |
Photo 30 |
|
Photo 31 |
Photo 32 |


Photo 33
Photos 34 – 37: Stages of the shield painting.
|
Photo 34 |
Photo 35 |
|
Photo 36 |
Photo 37 |


Photos 38 – 42: The finished result.
|
Photo 38 |
Photo 39 |
|
Photo 40 |
Photo 41 |


Photo 42
Paint mixes:
|
Red Base: AC13 + AV850 H/L : base + AV909 H/H/L: H/L + AV845 L/L : base + AC 26 L/L/L : more AC26
|
Mix used for metallic parts Base: AC28 + AC4 + AC16 H/L : base + AC16 + AC4 H/H/L : AC51 + AC16 L/L : base + AV822 L/L/L : AV822
|
|
White leather straps Base: Vallejo Offwhite + AC1 + AV921 H/L : Base + offwhite H/H/L : offwhite L/L: base + AC1 + AV921 L/L/L : L/L + AC26
|
Leather shoes Base: AC41 + AC17 H/L : base + AC15 H/H/L: AC15 L/L : Base + AC26 L/L/L : more AC26
|
I hope that my ways and methods will be of help to anyone trying to start out. After all, these are the exact objectives of these tutorials. Until the next part, happy painting!!!
Copyright © El Greco Miniatures, 2006-2020