Plate and Mail Armour
by Stephen Mallia
After a series of articles which tackled various aspects of figure sculpting/painting, we decided to bring to you another feature. In this article, I will deal with mail and plate armour on white metal figures. It is important to note that this is specifically for white metal figures, since the approach for resin or plastic figures is totally different. Also, and this I repeat all the time, is that this is my method and not ‘THE’ method, since there are other ways to handle this. For this article, I chose a figure by Elite Miniatures, the Alfarez de Santiago-Malta 1565, for the sole reason that it has both mail and plate armour.

Cleaning and preparation
The cleaning process is the normal one and is amply explained in another article dealing with the cleaning and preparation of white metal figures. With all mould lines removed the figure is given a good scrub with fine steel wool. This will make any imperfections stand out and subsequently corrected. If you want to prime the non metal parts now is the time. All the areas to receive treatment are masked either by products like MASKOL or even Blutack. After the primer has been applied and thoroughly dry the masking is removed. Now the fun begins!!


This coat is left on for about 5 minutes (or even less depending on how dark you want the stain). The more you leave the coat on, the darker the stain. Now, with a piece of tissue paper, start taking off the oil paint coating. Try not to hold the figure parts with your fingers but put them between the tissues and rub the oil paint off. Thus you will avoid leaving any fingerprints on. A word of warning here. This step is messy, so have a pile of tissue paper at hand. You will need them!! Also, if possible have all the parts fixed with handle holds on toothpicks or something similar. This will ease the messy problems. Try to work on one area at a time but make sure you leave the oil paint on for the same time on each part. That way you will have an even stain.
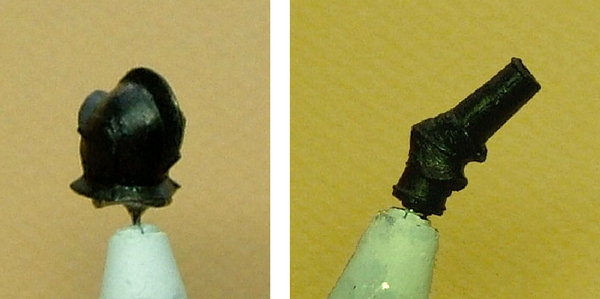
 Oil paint removed from arm - Paint removed from upper part. Note difference in lower part.
Now examine all the parts and go over the areas where you usually outline with dark paint. With a fine brush outline with the oil paint and with a DRY clean brush feather the freshly applied paint. You’re nearly there. Put the treated parts in the crockpot for a few hours to make sure the oil paint is completely dry before going any further. When this happens apply some highlights with some silvery paint along the edges. Be careful not to overdo this.

Lower area with paint removed after application | Armour with highlights and rust added
I hope this article will help improve this technical area of your figure painting. Keep your brushes wet and for the next one!
Copyright © El Greco Miniatures, 2006-2020